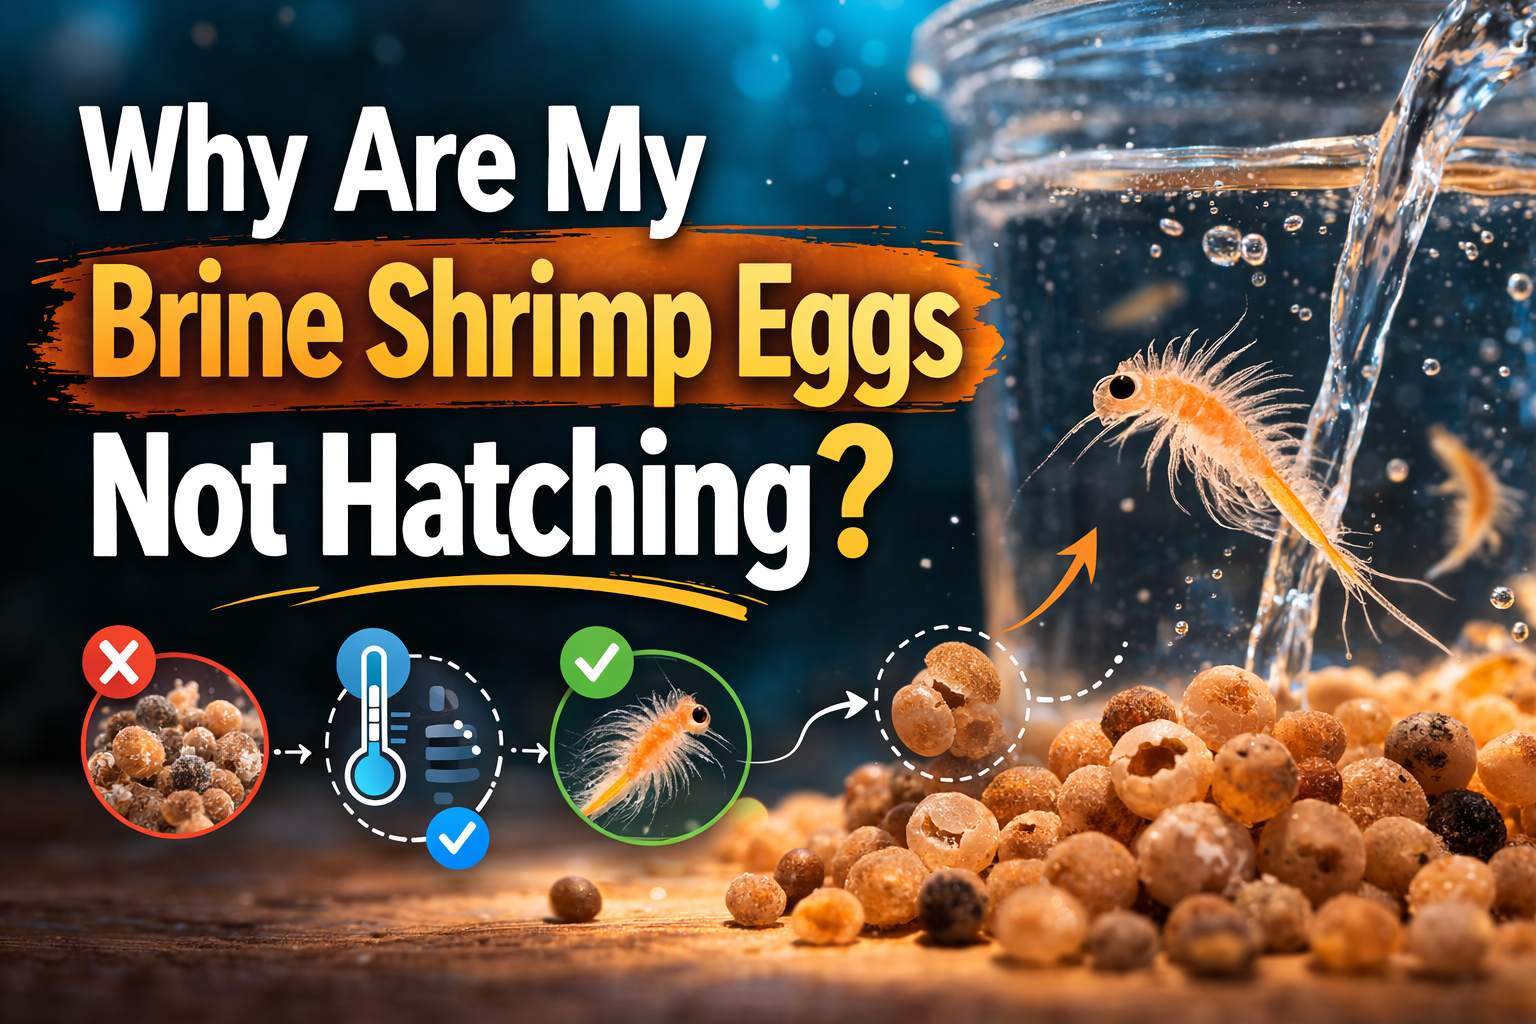
If you have been eagerly waiting 24 to 48 hours, only to find a batch of brine shrimp eggs with almost no visible activity, it is easy to wonder whether you did something wrong. Don’t worry—this is actually a very common issue for beginners. In most cases, it does not mean you are “bad at it.” More often, one or two small details involving temperature, salinity, water movement, or egg condition are simply not quite right.
As an experienced supplier in the brine shrimp eggs industry, we have a deep understanding of brine shrimp egg hatching. In this article, I will help you quickly identify the most common reasons for hatching failure. You will learn why the eggs are not hatching, which factor to correct first for the biggest improvement, and how to achieve more stable hatch rates in the future.
Rule Out the Basic Brine Shrimp Egg Hatching Mistakes First
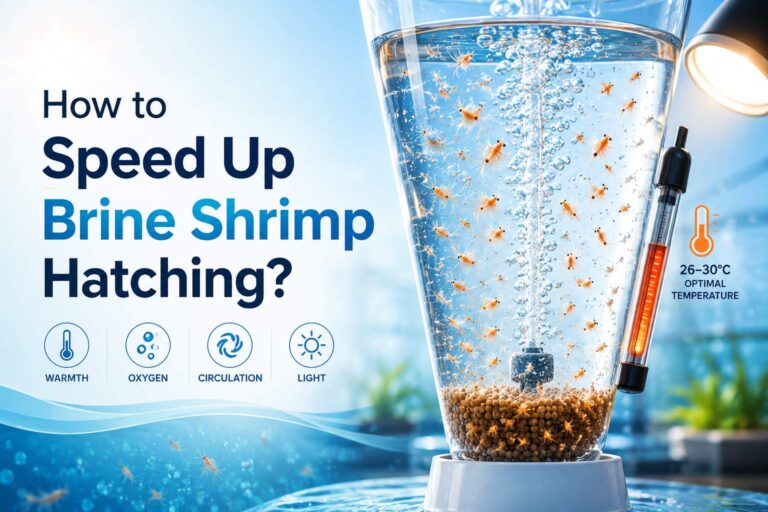
When brine shrimp eggs “fail to hatch,” the problem is often not something complicated. In many cases, the most basic conditions have not been properly set. The factors that most directly affect hatching are usually temperature, salinity, whether the water is being continuously stirred, and how fresh the eggs are. Under suitable conditions, brine shrimp eggs generally begin hatching gradually within about 18–36 hours. If they are taking much longer, water temperature is usually the first thing to check. A more suitable range is generally around 26–28°C.
Before assuming you bought “bad eggs,” spend five minutes checking the following points. Very often, the problem is here:
| Check Item | Common Problem | More Reliable Approach |
|---|---|---|
| Whether the eggs have been exposed to sunlight or moisture | After opening, they are left out casually and gradually absorb moisture, which can significantly reduce hatch rate | Use eggs that are as fresh as possible and store them sealed. Keep them in a cool, dry place. Brine shrimp eggs are best stored away from light and humidity, and repeated moisture exposure will affect performance. |
| Whether the salt level is appropriate | Salt is added by guesswork, so the amount varies, or the salt contains too many impurities | It is more reliable to use clean coarse salt, sea salt, or aquaculture salt. A salinity of 15–35 g/L is commonly used; for more stable results, 25–30 g/L is a good range. |
| Whether the water temperature is stable enough | It “feels about right,” but is actually only around 20°C | It is not just about whether the water feels warm—the key is stability. Usually, 26–28°C is more suitable. Lower temperatures may not completely prevent hatching, but they can significantly slow it down and reduce the number of hatchlings. Excessively high temperatures can also cause problems. |
| Whether there is truly continuous aeration | A few bubbles are visible, so it is assumed the eggs are circulating | The key is not just “having bubbles,” but keeping the eggs gently moving at all times so they do not settle at the bottom. Continuous aeration both supplies oxygen and keeps the shells suspended, which is critical for hatch rate. |
| Whether the lighting is too weak | The eggs are kept in a very dark place the entire time | During hatching, try to provide steady light, which usually produces more consistent results. |
A simple way to judge the situation:
If your eggs have been opened for a long time, the salt was added by hand without measurement, the room temperature is on the cool side, and the bubbling is weak, then the issue is probably not just one single problem. It is more likely that several small problems are stacking up and reducing the overall hatch rate together.
The solution is actually quite simple:
You do not necessarily need to buy a lot of extra equipment right away. Very often, just fixing the two most basic things will save you a lot of trouble:
A thermometer—stop guessing the water temperature by touch.
A small air pump—make sure the eggs are not sinking to the bottom.
Once these two are in place, then adjust salinity and timing. That is usually more effective than getting stuck on complicated theories from the start.
Systematic Diagnosis: 6 Main Causes Ranked by Impact + How to Fix Them
If you have already ruled out the most basic mistakes and the brine shrimp eggs still are not hatching, stop making random adjustments based on guesswork. A more effective method is to troubleshoot one factor at a time, starting with the ones that matter most. The issues most worth checking first are usually temperature, aeration and circulation, salinity, pH, egg quality, and light. Under relatively ideal conditions, brine shrimp eggs usually start showing obvious hatch-out around 18–24 hours, though slower batches may take 24–36 hours.
1. The Temperature Is Too Low, or It Fluctuates Too Much
This is often the most common and most easily overlooked issue. Many people think, “As long as the room isn’t cold, it should be fine,” but for brine shrimp eggs, a difference of just a few degrees can lead to very different results. In a typical home setup, the safest approach is usually to keep the water as close as possible to 26–28°C. If the temperature is too low, hatching will become noticeably slower and the number of hatchlings may also drop. If the temperature keeps rising and falling, the results will become much less stable.
How to check:
Stop guessing the temperature by touching the water. Use a thermometer and check the actual number. In particular, measure once at night and once early in the morning. Many people find that everything seems fine during the day, but the temperature drops significantly overnight.
How to fix it:
Try to keep the water stable at 26–28°C. You do not need complicated equipment—a small heater and a thermometer are usually enough. The key is not making the water as warm as possible, but preventing repeated fluctuations.
Pitfall to avoid:
Do not place the container directly in the sun to heat it, and do not keep turning the power on and off. Brine shrimp eggs are not only sensitive to low temperature—they also do poorly with repeated instability.
2. Aeration Is Too Weak, or Too Strong
Another very common issue is aeration. During hatching, brine shrimp eggs need not only oxygen, but also continuous gentle movement. If the eggs keep settling at the bottom, problems are likely to occur. But if the bubbles are too forceful and the water flow is too chaotic, that is not ideal either. The best condition is one in which the eggs stay suspended and roll gently.
How to check:
Watch the container for ten seconds and you can usually tell:
If most of the eggs are piled up on the bottom, aeration is too weak.
If the water is churning violently, the airflow may be too strong.
The ideal condition is this: the eggs do not sink, but the water surface does not look aggressively turbulent either.
How to fix it:
Place the air stone at the bottom so the bubbles rise evenly. Also, do not use a container that is too shallow—give the eggs enough vertical space to circulate. The key is to keep the eggs continuously lifted, not just produce a few bubbles now and then.
Pitfall to avoid:
More air is not always better. Your goal is not to make the water look like it is boiling, but to keep every egg gently moving.
3. The Salt Is Wrong, or the Concentration Is Off
Many beginners grab a handful of kitchen salt and start hatching right away, but both the type of salt and the concentration can directly affect the result. For home hatching, the principle can be kept simple: do not make it too dilute or too salty, and most importantly, do not mix it differently every time. Compared with ordinary iodized table salt, sea salt, aquarium salt, or non-iodized salt is usually much easier to work with.
How to check:
If you are using ordinary iodized table salt and adding it by feel, then this is very likely where the problem is.
How to fix it:
The simplest method is to stick to one fixed formula. Use the same container volume and the same salt amount each time, so at least the conditions do not drift. For more stable results, switch directly to sea salt or aquarium salt.
Pitfall to avoid:
Do not assume that because brine shrimp live in saltwater, “the saltier, the better” for hatching. Hatching conditions and later survival conditions are not the same, and moving too far from the right range will affect hatch-out.
4. The pH Is Too Low, or It Fluctuates Too Much
This factor is not as obvious as temperature or aeration, so it is often ignored, but it does affect hatching performance. For home hatching, as long as the water does not become too acidic, you can usually avoid many problems. Keeping the pH roughly in the 8 to 9 range is generally safer.
How to check:
If the water you use is naturally acidic, or if you frequently change the water or add substances during the process, then pay attention to whether the pH is swinging back and forth. Under home conditions, a simple test strip is enough to get a rough reading.
How to fix it:
If the pH is clearly too low, raise it gradually in small amounts. Be gentle—do not add too much at once. Stability is still the main priority.
Pitfall to avoid:
Do not chase a perfect-looking number by making aggressive adjustments all at once. For beginners, stability is usually more important than precision.
5. The Eggs Are Low Quality, or Stored Improperly
Sometimes the earlier conditions are all reasonably well controlled, yet the hatch rate is still very low. In that case, you should start suspecting the eggs themselves. If brine shrimp eggs have absorbed moisture, been stored too long, or been opened repeatedly, their performance usually declines. In many cases, it is not that your hatching method is completely wrong, but that the eggs are no longer in good condition.
How to check:
If the package has been opened for a long time, taken out and put back many times, or stored in a warm, humid place, then do not expect it to maintain a very high hatch rate.
How to fix it:
Buy fresher eggs whenever possible. After opening, store them sealed in a cool, dry place; refrigeration is even more reliable if available. What hurts storage most is moisture, heat, and repeated exposure to air.
Pitfall to avoid:
Do not blame every failure on temperature or salinity. Once the storage condition of the eggs has deteriorated, even perfect hatching conditions later may not restore good performance.
6. The Light Is Too Weak, or the Eggs Are Kept in Darkness
The last easily overlooked factor is lighting. If the environment stays too dark during hatching, it can also slow down hatch-out. In home setups, you do not need any special equipment—a regular desk lamp or LED light is usually enough as long as the lighting is steady.
How to check:
If your hatching container is always placed in a corner, inside a cabinet, or anywhere that stays dim all day, then lighting may be part of the problem.
How to fix it:
Provide steady, continuous light. The point is not to heat the water, but to keep the hatching environment from remaining too dark.
Pitfall to avoid:
What you need is steady illumination, not high-heat sun exposure. The light is for lighting, not for cooking the water.
A Quick Summary
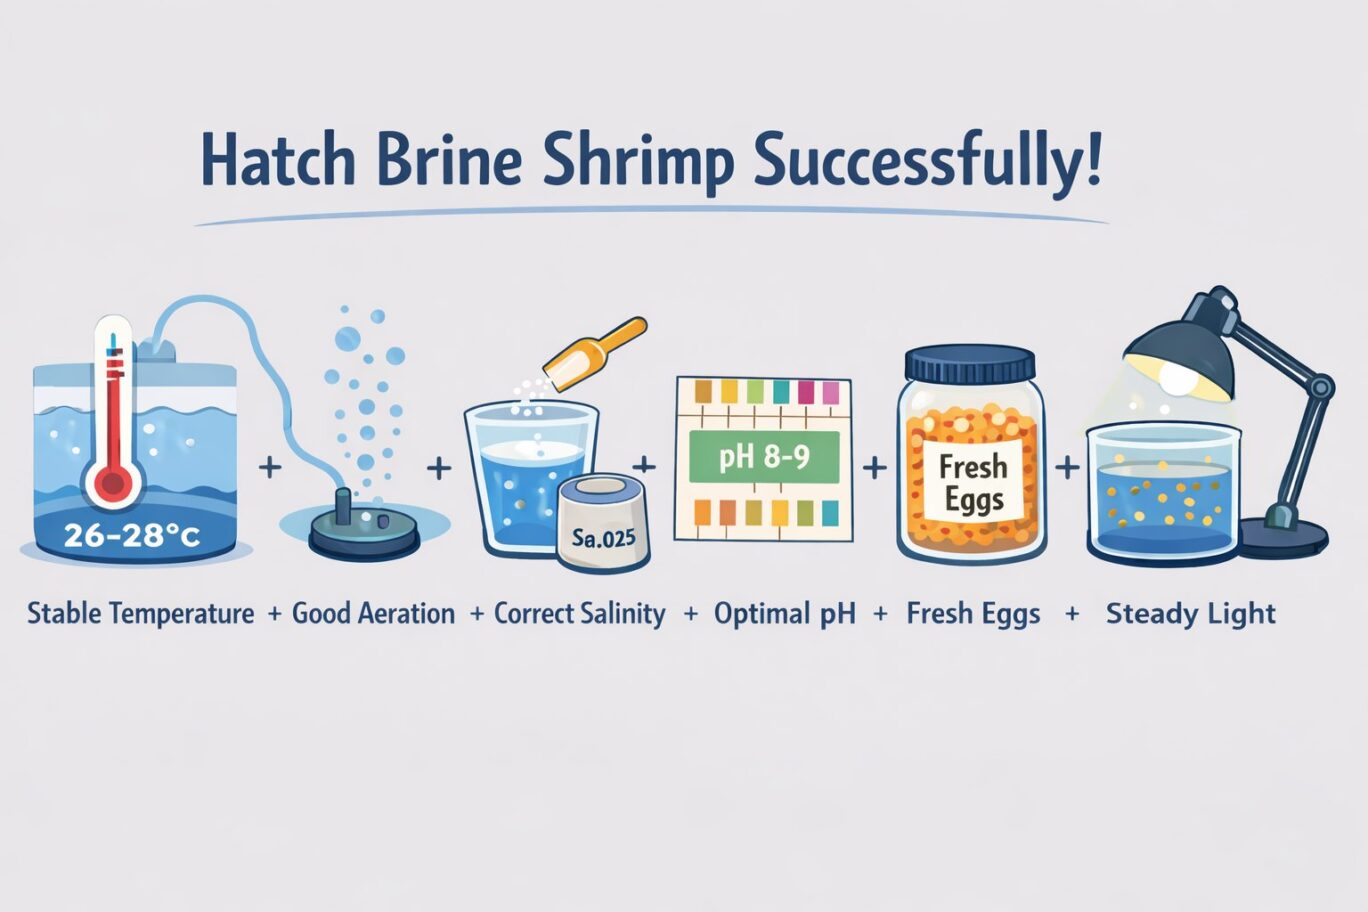
If your brine shrimp eggs are still not hatching, the most worthwhile things to check first are usually not complicated causes, but the basic conditions that are most likely to go wrong: whether the temperature is stable, whether the eggs remain suspended, whether the salinity is correct, whether there is enough light, and whether the eggs themselves have become damp or old. In many failed batches, no single step was completely wrong—rather, two or three small issues overlapped and pulled down the hatch rate together. Correcting them one by one in order is usually more effective than making repeated random adjustments. In home hatching, the essentials are simple: stable temperature, proper salinity, continuous aeration, steady light, and eggs that are as fresh as possible.
Prevention: A Brine Shrimp Egg Hatching Process That Is Less Likely to Fail
If you want more stable hatching, the key is usually not rescuing the process after problems appear, but setting up the basic conditions properly from the beginning: the right saltwater ratio, stable temperature, continuous aeration, decent lighting, and not overloading the container with too many eggs. When these conditions are in place, hatch-out generally begins gradually within 24 to 36 hours. For home hatching, being conservative with the amount of eggs usually makes the process easier to control and more stable.
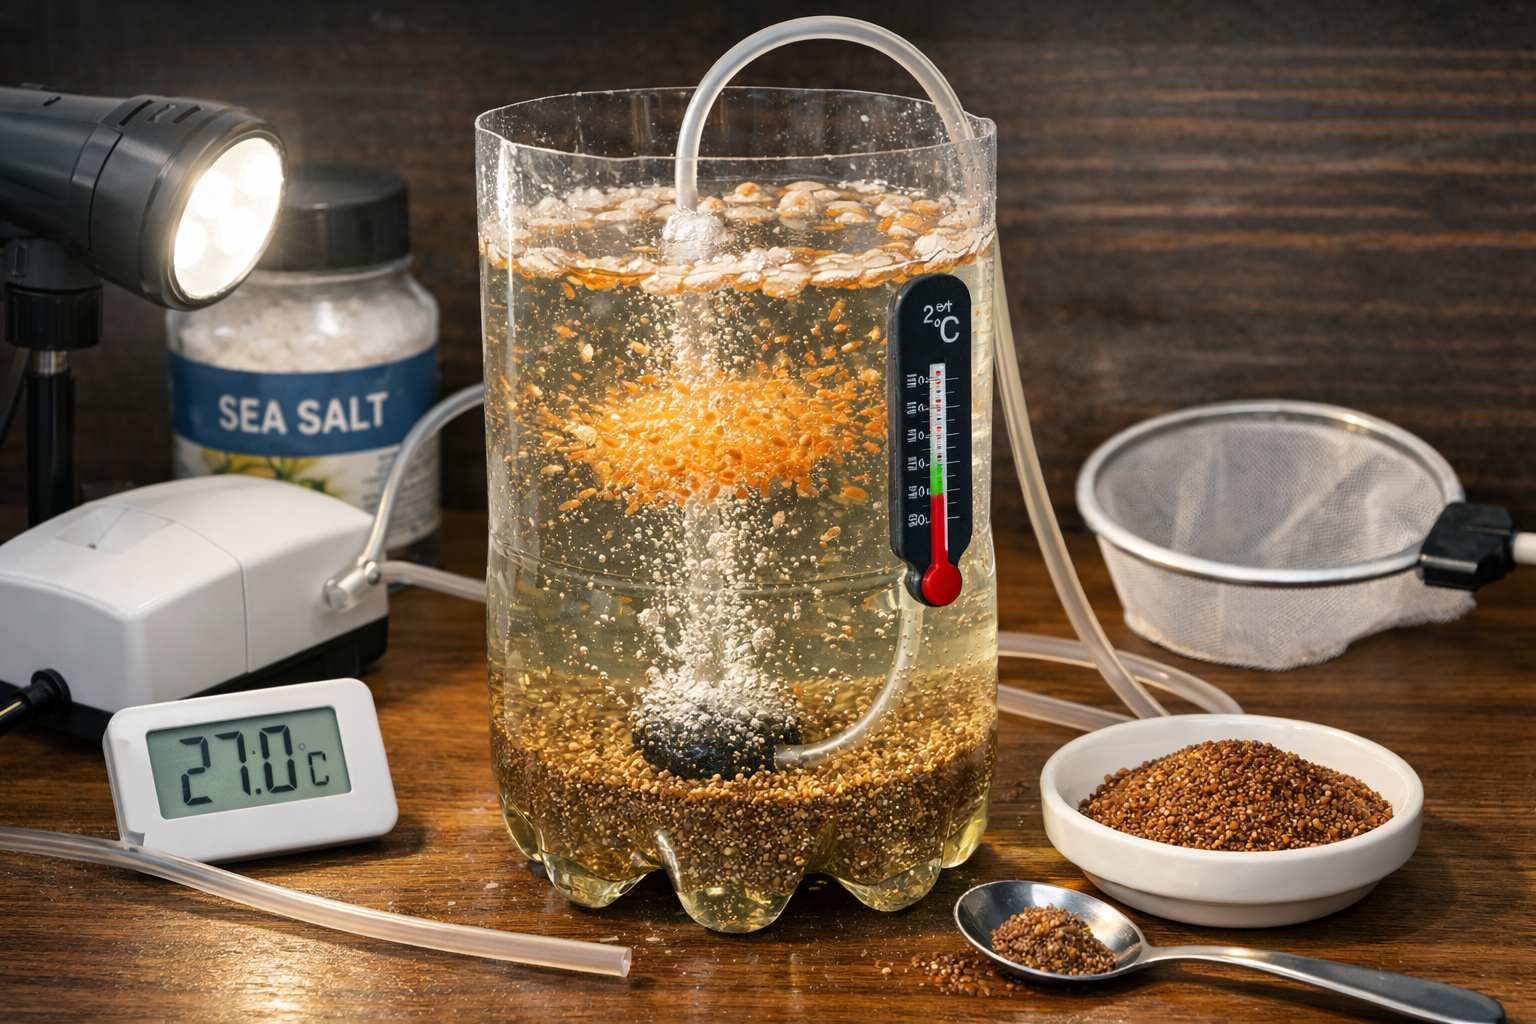
Step 1: Prepare the Container First—the Simpler It Is, the Less Likely It Is to Go Wrong
For home hatching, there is no need to start with complex equipment. A clear plastic bottle, a small hatchery box, or a narrow transparent container is usually enough. What matters is not how “professional” the equipment looks, but whether it is easy to observe, easy to aerate, and easy to tell whether the eggs are settling at the bottom. Transparent containers also have a practical advantage later: they make it easier to distinguish empty shells from newly hatched nauplii.
Before you begin, clean the container thoroughly and make sure no detergent or other chemical residue remains. In many cases, the problem is not the hatching process itself, but sloppy preparation beforehand.
Step 2: Mix the Saltwater First, Then Adjust the Temperature
A more reliable method is to dissolve the salt completely before adding the eggs. For typical home use, adding about 25 grams of sea salt or aquarium salt per 1 liter of water is convenient and practical. Keeping the water temperature between 26–28°C also makes successful hatching more likely.
The biggest advantage of doing it this way is consistency. Each batch starts from roughly the same conditions, which reduces variables and makes troubleshooting easier later. Prepare the saltwater separately, confirm that the salt has fully dissolved and the temperature is correct, and only then pour it into the hatching container. Do not add eggs while still adding salt, and do not let the concentration vary every time. What brine shrimp eggs often dislike most is not an occasional imperfect batch, but different conditions every single time.
Step 3: Do Not Add Too Many Eggs—It Is Better to Use Less Than to Overcrowd
Brine shrimp eggs are very small, and many people accidentally add too much because they assume, “If I add more, I’ll get more hatchlings.” In practice, however, when the egg density is too high, the water becomes more crowded, circulation becomes less even, and the final hatch result is often less stable.
For home hatching, keeping it around 1 gram per liter is usually easier to manage. Especially for beginners, using a smaller amount consistently and being able to observe the process clearly is much better than dumping in a lot at once.
Step 4: Once the Air Pump Is On, the Goal Is Not Violent Bubbling, but Keeping the Eggs Suspended
Aeration is not just for oxygen—it is even more important for keeping the eggs in motion at all times so they do not settle on the bottom. The truly ideal condition is that the eggs remain suspended and slowly rolling, instead of lying motionless at the bottom.
This is where many people misunderstand the process: stronger aeration is not automatically better. What you want is continuous movement, not water churning like a boiling pot. A very practical way to judge is simply to look at the bottom—if there is a visible layer of eggs resting there, the airflow is too weak. If almost none are settling and the water is not so turbulent that you cannot see clearly, then it is probably about right.
At this stage, turning on a light also helps keep the process more stable. Steady lighting often makes the whole hatching process run more smoothly.
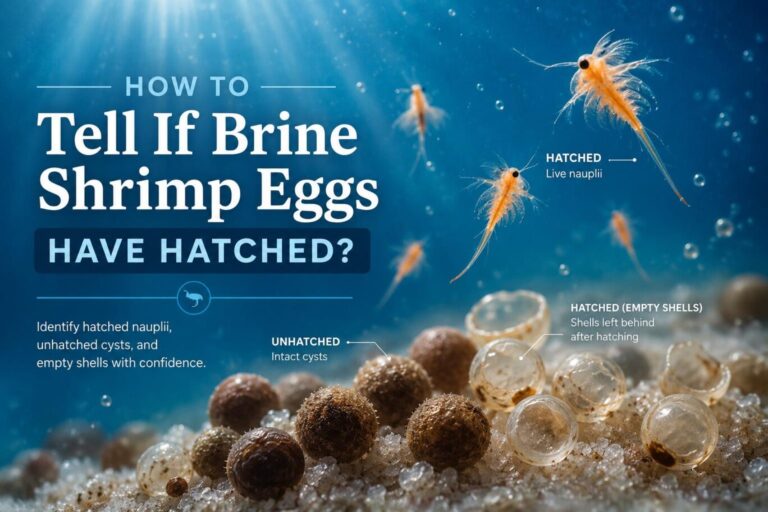
Step 5: Harvest After 24–36 Hours—Stop the Air First, Then Separate
At harvest time, the biggest mistake is rushing. A more reliable method is to wait until most of the eggs have hatched, then turn off the air pump and let the container sit quietly for a while. Once the aeration stops, newly hatched nauplii, empty shells, and unhatched eggs will slowly separate into layers. At that point, use a dropper, hose, or small net to collect what you need. This usually gives you a much cleaner harvest.
A simple way to think about it is this: let the layers separate first, then take the one you want. If you try to scoop while the air is still running, you often end up with shells, dead eggs, and nauplii all mixed together, which is much more troublesome to handle.
Another Quick Summary
If you want brine shrimp eggs to hatch more consistently, the most effective approach is never constant formula-changing, but making the process itself consistent: keep the container clean, mix the saltwater in advance, avoid large temperature fluctuations, do not overstock the eggs, keep aeration going so the eggs do not settle, provide steady light, and harvest only when the time is right.
When you follow the same steps every time, many problems naturally become less frequent, and hatch rates become much more stable than with a random, improvised approach. In the end, successful brine shrimp hatching is not about luck—it is about doing each step consistently and making the process repeatable.
Advanced: From “Brine Shrimp Eggs Can Hatch” to “Higher Yield and Better Feeding Value”
If you can already hatch brine shrimp eggs fairly consistently, then the next challenge is no longer simply whether they hatch at all. Instead, two more practical goals come into focus: first, how to increase the number of hatchlings from each batch as much as possible; second, how to make the newly hatched shrimp more useful as fish feed.
At first, many people focus entirely on the hatching step itself. But what really makes the difference often comes down to what happens afterward: how to deal with eggs that have not hatched yet, how to arrange the hatching rhythm, and whether the newly hatched shrimp are used in time.
First, yield. Many people check the batch at around 24 hours, see that some eggs still have not hatched, and dump the rest right away. In fact, there is usually no need to rush. Brine shrimp do not always hatch in perfect sync. In the same batch, some hatch earlier and some later. Just because they have not hatched in the first round does not necessarily mean they never will.
A more reliable approach is to collect the hatched nauplii first and leave the remaining portion for a little longer. The advantage is obvious: you do not waste eggs that might still hatch later just because you gave up too early. In the end, hatching is not a “lift the lid at one exact moment” process, but something that happens gradually. Once you understand that, your total output is often much more solid.
Now for feeding value. Newly hatched brine shrimp can absolutely be fed to fish right away—that is not a problem. But if you are raising fry that are more sensitive to food quality, then it is not enough to simply think, “At least I have something to feed.” Newly hatched brine shrimp still carry part of their own nutritional reserves, but these reserves are gradually consumed over time. If you leave them unfed after hatching and only feed them to fish the next day or even the day after, they may still be alive, but their practical feeding value will usually have declined.
So the idea is simple: feeding them immediately is fine, but if you want them to be more nutritious, do not let them drift around unfed for too long. Especially if you plan to keep them a while before feeding, it is best to let them take in some food first so they maintain better condition.
Under home conditions, this step does not need to be overly complicated. In the long run, simple and stable methods are usually best. One practical direction is to use algae-based feed, because it fits naturally with the later culture of brine shrimp and is easy to understand. You do not need to think of “enrichment” as something highly technical—in essence, it just means not letting the newly hatched shrimp swim around hungry for too long. As long as they can take in a little food within a short time, their overall condition is usually better than if they are simply left alone.
People who truly want to do this more consistently usually do not rely on one bottle, one batch of eggs, and pure luck. A more practical method is staggered hatching. For example, run two or more containers on different schedules so that you have fresh nauplii available more regularly every day and do not lose your supply just because one batch underperforms.
The advantages of this method are quite clear. First, you are not putting all your hopes into one single batch. Second, if something goes wrong, it becomes much easier to identify the cause. When several batches are running at the same time, you can tell more clearly whether the issue comes from one particular batch of eggs or from salinity, temperature, or some part of your handling process. Compared with simply adding more eggs and hoping for the best, staggered rotation is much more reliable and much better suited for long-term use.
So once you have crossed the threshold of “they can hatch,” the focus afterward becomes much clearer: do not give up too early on eggs that are not fully hatched yet, do not let already hatched nauplii waste away unfed, and do not rely only on single-bottle, single-batch results. The thing that turns brine shrimp into a stable, ongoing resource is not some mysterious technique, but a smoother and better-managed process: stagger, observe, supplement, and rotate. At that point, what you gain is not just “this batch hatched again,” but a small system that can provide a steady supply with more controllable quality.
FAQ: A Few Questions Beginners Most Commonly Get Stuck On
Do I Need to Pick Out the Shells One by One After Hatching?
Usually not. A much easier method is to stop the aeration after most of the nauplii have hatched and let the container sit for a few minutes. The empty shells, unhatched eggs, and nauplii will gradually separate. Then you can collect the layer you want much more easily than trying to scoop while the air is still running, and you are also less likely to bring along a lot of unwanted debris.
Can I Use Old Aquarium Water Directly for Hatching?
If you want more stable results, it is still better to use freshly mixed saltwater. The reason is simple: fresh water is easier to control, and if something goes wrong, it is easier to tell whether the problem came from temperature, salt, aeration, or the eggs themselves. If you use old tank water directly, the number of variables increases immediately, and it becomes much harder to figure out where the problem came from. Public hatching guides also generally recommend preparing a hatching solution with clean water plus sea salt or aquarium salt, rather than emphasizing old tank water.
Why Have Some Eggs Hatched While Others Still Have Not Moved at All?
This is very common and does not necessarily mean the entire batch is bad. Brine shrimp eggs do not always open at exactly the same time. A typical situation is that one portion hatches first, while the rest takes longer. If the temperature is unstable, the aeration is too weak, or some of the eggs have been sitting on the bottom, this “some hatch earlier, some hatch later” situation becomes even more obvious. Do not dump the whole batch just because not all of it has hatched yet. Go back and check temperature and aeration first—this is usually more effective than immediately switching to a new batch of eggs.
Why Is the Hatch Rate Still Low Even Though I Can See Bubbles?
Because the key is not simply “having bubbles,” but whether the eggs are being gently kept in motion the whole time. The truly effective condition is not a few occasional bubbles, and not violent boiling-like turbulence either. It is keeping most of the eggs from settling at the bottom and maintaining a suspended, slow rolling motion. If your eggs keep piling up on the bottom, then the aeration is usually still insufficient.
Why are my brine shrimp eggs not hatching?
In most cases, brine shrimp eggs fail to hatch because one or more basic conditions are not quite right. The most common causes are unstable temperature, weak aeration, incorrect salinity, insufficient light, or eggs that have absorbed moisture or been stored too long. The first things to check are whether the water is staying around 26–28°C, whether the eggs are being kept suspended, and whether the eggs are still fresh enough to hatch well.
How long does it take for brine shrimp eggs to hatch?
Brine shrimp eggs usually begin hatching within about 18–36 hours under suitable conditions. In many home setups, the most obvious hatch-out is often seen around 24–36 hours. If they are taking much longer, temperature is usually the first thing to check.
What temperature is best for hatching brine shrimp eggs?
A stable temperature of about 26–28°C is usually the most reliable range. Lower temperatures can slow hatching and reduce hatch rates, while repeated temperature swings can make the results much less stable. Warm water helps, but stability matters even more.
Can brine shrimp hatch at room temperature?
They sometimes can, but room temperature is often less reliable than keeping the water at 26–28°C. If the room is cool, hatching may become much slower and the hatch rate may drop. For more consistent results, it is better not to depend on room temperature alone.
Can brine shrimp hatch in 12 hours?
Usually not. In most home hatching setups, brine shrimp eggs need more time and commonly begin hatching within about 18–36 hours. If there is no visible activity at 12 hours, it usually just means the batch needs more time.
Do brine shrimp eggs need light to hatch?
Steady light usually helps produce more consistent hatching results. They do not need intense heat from direct sun, but keeping them in a very dark place can slow hatch-out. A regular desk lamp or LED light is usually enough as long as the light is steady.
Can brine shrimp hatch in the dark?
They may still hatch, but results are often less consistent in a dark environment. Weak lighting can slow hatch-out and make the process less stable. A simple steady light source usually works better than leaving the container in a dim corner.
Can brine shrimp hatch without air?
Continuous aeration is strongly recommended. It does not just add oxygen—it also keeps the eggs gently moving so they do not settle on the bottom. When eggs sit still for too long, hatch rates usually become less reliable.
Can you use table salt to hatch brine shrimp eggs?
It is possible, but it is usually less reliable than sea salt, aquarium salt, or non-iodized salt. Ordinary iodized table salt can make hatching less consistent, especially if the amount is added by guesswork. For more stable results, use a cleaner salt source and keep the formula the same each time.
How much baking soda for brine shrimp?
The safer approach is not to chase an exact number unless the pH is clearly too low. What matters most is keeping the water roughly in the pH 8–9 range without large swings. If the pH needs adjustment, raise it gradually in small amounts instead of making a strong correction all at once.
What to do with unhatched brine shrimp eggs?
Do not throw them away too quickly. Brine shrimp eggs do not always hatch at exactly the same time, so some may still hatch later. A practical approach is to collect the hatched nauplii first and leave the remaining eggs a little longer before deciding the batch is finished.
What to feed newly hatched brine shrimp?
Newly hatched brine shrimp can be fed to fish right away. If they will be kept longer before feeding, do not leave them unfed for too long because their nutritional value gradually declines. Letting them take in some food, such as algae-based feed, helps keep them in better condition.
Conclusion: Troubleshoot in Order First, Then Turn Success into Something Repeatable
If your brine shrimp eggs keep failing to hatch, do not blame bad luck too quickly, and do not immediately assume the eggs themselves are defective. In most cases, the factors that truly affect the result are several seemingly minor conditions that have not been coordinated properly—for example, unstable temperature, insufficient continuous aeration, the wrong saltwater ratio, weak lighting, or poor egg storage condition. Under normal circumstances, as long as the environment is suitable, brine shrimp eggs usually begin hatching gradually within 24 to 36 hours. If you want more stable hatching, the key is not constantly changing methods, but keeping several core conditions within a stable range as much as possible.
When the eggs are not hatching, the biggest mistake is not making an error—it is changing too many things at once. Adjusting the temperature a little, adding more salt, changing the airflow, switching the container—once everything is altered at the same time, it actually becomes harder to tell what the real problem was. A more practical approach is to troubleshoot in order: first confirm whether the temperature is stable, then check whether the aeration keeps the eggs suspended, then examine salinity, lighting, and whether the eggs have absorbed moisture or been stored too long. Very often, no single step was completely wrong; instead, two or three small issues overlapped and dragged down the hatch rate together.
Doing this well is not about improvising every time, but about gradually standardizing your process. Before each hatch, check the container, saltwater, temperature, and aeration according to the same routine. After hatching begins, make a simple note of roughly how long it took and which step seemed most prone to problems. The biggest advantage of doing this is not only figuring out why this batch failed, but making sure you do not have to guess next time. Once the process becomes stable, the hatching performance of brine shrimp eggs usually becomes much more reliable than a “change things whenever you think of it” approach.
You can absolutely treat this article as your own troubleshooting checklist. Before the next hatch, go through the temperature, aeration, and saltwater setup in order. After the hatch, make a quick note of the settings you used and the result you got. Over time, you will become clearer and clearer about which factor is really affecting the hatch rate.
Once you solve the problem of “they won’t hatch,” what you gain is not just the ability to hatch brine shrimp eggs. You are also building a reusable live-feed management method. In the future, whether you want more stable hatching or want to keep newly hatched shrimp alive longer and use them more effectively, this same approach will continue to help you.